|
| |
TM 5-4210-220-34
3-8.
ENGINE - Continued
(2)
Clean ring grooves with suitable carbon removal tool. Piston skirt is tin plated and must not be wire brushed
to remove hard carbon deposits. Piston crown is not tin plated and may be wire, brushed to remove hard
carbon deposits.
(3)
Clean inside of crown area, and oil drain holes in ring groove area of skirt Do not enlarge drain holes during
cleaning procedures.
(4)
Inspect tin plating of skirt for scoring, abnormal wear symptoms, cracked or damaged ring groove lands.
Replace if severely scored, damaged, or overheated.
(15)
Inspect crown for scoring or cracked or damaged ring groove lands. Replace if severely scored or damaged.
(6)
Check tapered fire ring groove in crown with tool J24599. Place wire of 0.106 in. (2.692 mm) diameter In
ring groove. Slide wire completely around groove. If the wire is below flush, at any point, piston crown must
be replaced. The 0.100 in. (2.54 mm) diameter wire should be flush or protrude slightly from fire ring groove
of piston.
NOTE
Components of piston assemblies can in certain instances be reused. Undamaged piston pins, crowns, and
bushings that meet dimensional limits for used parts can be reused if installed within the same piston
assembly from which they were removed. The crown, pin and bushing of a cross head piston assembly
should be considered as a matched set. If a crown is replaced, piston pin and bushing must also be
replaced. Similarly, if a bushing needs replacement, a new pin must also be used.
(7)
Check for bent connecting rod, bearing failure causing damage to rod or rod cap, and/or discoloration or
blueing of parts. Replace rod if any of above are found.
(8)
Check for cracks in rods as detailed in para.
2-7.
(9)
Tighten retaining nuts on connecting rod to
70 ft lb (95 Nm).
(10)
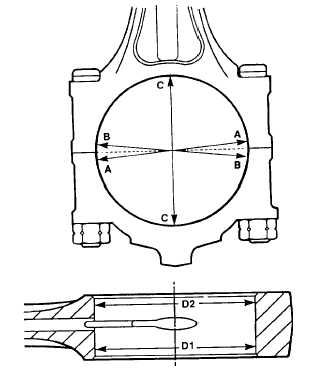
Measure diameter (A and B). The average
measurement of (A and B) is the size at the
split line (X) . X = (A + B)/2.
(11)
Measure diameter (C). The difference in
measurements (X and C) gives the bore
out-of-round measurement; maximum of
0.005 in. (0.127 mm) is
allowable.
Replace rod if not within specification.
(12)
Obtain average bore diameter (Y). Y = (C +
X)/2. Average bore diameter must be
within 3.2495 3.2515 in. (82.537 82.588
mm).
Replace
rod
if
not
within
specification.
(13)
Measure the dimensions (D1 and D2). The
difference between D1 and D2 (taper)
should be 0.0005 in. (0.0127 mm)
maximum. Replace rod if not within
specification.
3-165
|

