|
| |
TM 5-4210-220-34
3-7.
TRANSMISSION-Continued
(1)
Visually inspect planetary carrier assembly for evidence of excessive wear, overheat indication, damaged
or heavy metal contamination.
(2)
Tools required for rebuild are planetary rebuilding kit J25587-01 and a ten ton hydraulic press with an
adjustable bed of 25 in. minimum opening. The press must also have a pressure gage to correctly install
the pinion pins.
NOTE
Do not disassemble carrier assembly unless parts replacement is necessary. Failure of one pinion
requires replacement of the entire pinion gear set because they are selectively matched.
(3)
Check end play of planetary carrier pinions. With washer held flat, insert feeler gage between carrier and
thrust washer. End play must be within 0.008-0.031 in. (0.203-0.787 mm).
(4)
If planetary carrier requires overhaul, use a drill that is slightly smaller than the pinion pin diameter, drill
into the swaged ends of the pins (only one end required). Do not drill into the carrier. The rear ends of all
pinion pins except those in the center carrier assembly will be drilled. Drill the front ends of the center
assembly pins.
(5)
Place press fixture J25587-1 in hydraulic press. Select proper adaptors to perform removal or installation
operations on planetary to be overhauled.
(6)
Refer to para. z. for front planetary gear overhaul; para. aa. for center planetary gear overhaul; para. ab.
for rear planetary gear overhaul and para. ac. for low planetary gear overhaul.
z.
Front Planetary Gear Overhaul
(1)
Front planetary gear overhaul requires
tools
J25587-1 Fixture
J25587-16 Pin Remover
J25587-20 (six) Loading Pin
J25587-49 (six) Guide Pin
J25587-9 Pin Installer
J25587-17 Swaging Tool Holder
J25587-25 (two) Swaging Tool
J25587-4 Support Block
(2)
Drill out planetary pins from rear side of
carrier. Place carrier assembly in fixture
with drilled pins up, Install pin remover
J25587-16 into fixture ram.
(3)
Press out six pins. Remove and keep six groups separate.
(4)
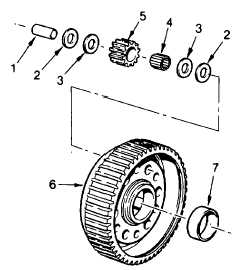
Inspect carrier (6) for loose or worn bushing (7). Replace housing carrier if damaged or worn excessively.
(5)
Install loading pin J25587-20 in each pinion (5). Install roller bearing (4) on pin, then steel and bronze
thrust washers (2 and 3) on each end. Lubricate needle bearings with transmission fluid (item 9, Appendix
B) before installation of groups into carrier.
3-53
|

