|
| |
TM 5-4210-220-34
3-7.
TRANSMISSION - Continued
(21) If a press is not available, the piston may be
installed with a hammer. Tap the piston
lightly in a continuous circular pattern until
the piston is properly seated.
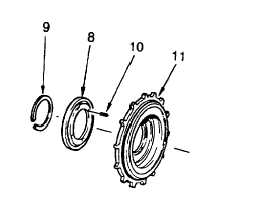
(22) Install 20 piston release springs (10), one
each on the 20 cast bosses on the fourth-
clutch piston.
(23) Install the spring retainer (8), recessed side
(outer lip) down, on the twenty piston return
springs (10).
(24) Compress
the
spring
retainer,
using
J24204-2 and J24204-3 tools until the snap
ring groove on the clutch hub is clear.
Install the snap ring (9).
WARNING
Do not install forward-clutch hub and fourth-clutch driving hub into the fourth-clutch housing assembly. Be
sure the forward-clutch hub and the fourth-clutch driving hub are installed into the forward-clutch
assembly. If these two hubs are installed into the fourth-clutch housing assembly by mistake, the
transmission will operate in reverse when the driver selects any forward range.
(25) Lubricate with petroleum jelly (item 21,
Appendix B) and install the bearing race
onto the rear hub of the fourth-clutch
housing.
(26) Lubricate with petroleum jelly (item 5,
Appendix B) and install the bearing race
onto the front hub of the fourth-clutch
housing assembly. Fourth clutch assembly
is ready for final installation.
v.
Removal of Center Support, Gear Unit, and
Second Clutch
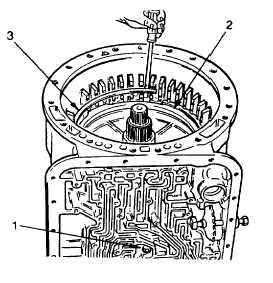
(1) Remove the center support anchor bolt and
washer (1).
(2) Remove the snap ring (3) that retains the center support assembly (2).
3-46
|