|
| |
TM 5-4210-220-34
2-21.
FRONT AXLE - Continued
2-21.2
Differential Carrier - Continued
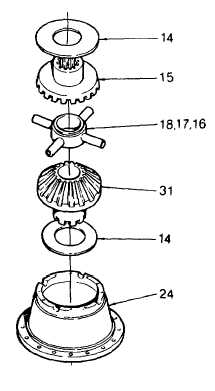
(16) Lift out spider (18) together with side
pinions (17), and thrust washers (16).
Remove inner side gear (31) and thrust
washer (14).
(17) Inspect inner and outer side gears and the
four side pinions. Replace all gears If
excessively
worn
or
damaged
teeth,
splines, or bearing surfaces are noticed on
any of the gears.
(18) Discard all thrust washers, (16 and 14) and
replace with new components. Inspect
thrust
washer
bearing
surfaces
in
differential case. Replace both halves as a
matched set if any surface is excessively
worn.
(19) Inspect differential bearings (9 and 22)
as detailed in para. 2-7. If replacement is
required, remove bearing cones from
differential case (20) and support cover (11)
using a suitable puller. Replace bearing
cups and cones in pairs.
NOTE
Prior to reassembly or installation, make sure all components are clean and coated with a film of
lubricating oil (item 17, Appendix B).
(20) If bearings are replaced, press new bearing cones (9 and 22) onto differential case (20) and support cover
(11). Be sure to use arbors that contact the bearing races only. Bearings may be damaged if pressure is
exerted on bearing roller cages.
(21) Install thrust washer (14), inner side gear (31), and spider (18) complete with side pinions (17) and thrust
washers (16) in support case (24).
(22) Install side gear (15), remaining thrust washer (14) and differential case (20). Make sure punch marks on
differential case and support case aline. Install capscrews (21) and tighten to 180 ft lb (245 Nm).
(23) Check free rotation of differential by turning side gear hub. Differential may require up to 50 ft lb (70 Nm)
torque to rotate.
NOTE
Front differential ring gear is attached with eight 3/4 in. 16 capscrews and locknuts. Rear differential ring
gear IS attached with sixteen 5/8 in. 18 capscrews and locknuts.
(24) Install ring gear (12) on differential support case (24) making sure bolt holes aline. A slight interference fit
may be present between the parts. If required, use a brass hammer to tap ring gear in place.
2-292
|

