|
| |
TM 5-4210-220-12
4-28. ENGINE - Continued
(7) Using an arbor press, carefully press piston
pin (7) from piston (5).
(8) Separate the connecting rod (4) from the
piston (5).
(9) Using a piston ring expander, remove the
compression rings (8) and oil rail (9) from
the piston (5).
(10) Repeat step 6 thru 9 for the other piston
assembly.
j. Crankshaft Removal
CAUTION
Removal of crankshaft may cause main
bearing damage. It is recommended to
inspect crankshaft and crankcase prior
to crankshaft removal.
NOTE
If visual inspection shows that the
crankcase or crankshaft is damaged,
the compressor should be replaced
with a new unit.
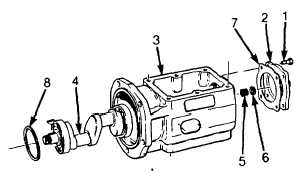
(1) Remove the four capscrews (1) securing
the end cap (2) to the crankcase (3).
(2) Using a soft faced hammer, gently tap end
cap (2) until it becomes loose.
(3) Carefully remove end cap (2) from
crankcase (3). Remove spring (5) and seal
ring (6).
(4) Remove and discard end cap gasket (7).
(5) Remove snap ring (8) from crankcase (3).
(6) Carefully maneuver crankshaft (4) from
crankcase (3).
4-541
|