|
| |
TM 5-4210-220-12
4-22. AIR SYSTEM - Continued
4-22.12 Air Drier - Continued
f.
Desiccant Filter Repair
NOTE
This task consists of replacing
the desiccant in the air drier.
This task may be accomplished with the
drier on the truck.
Ensure air tanks are drained prior to
repair.
(1)
Remove end cover as detailed in End
Cover Repair, steps 1 thru 5, preceding.
(2)
Remove the cartridge and desiccant
sealing plate assembly by unscrewing the
hex bolt seen inside the main shell of the
drier.
(3)
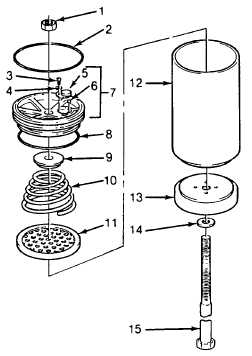
Remove locknut (1) from assembly,
assembly
is
spring
loaded.
Hold
assembly firmly while removing nut the
last few turns.
(4)
Lift off the desiccant plate assembly (7).
(5)
Remove the two O-rings (2 and 8) from the desiccant plate (7) and discard them.
(6)
Remove the ball check valve retaining clip (5) and remove and discard the rubber ball valve (6).
(7)
Clean the desiccant plate thoroughly. Be sure the purge orifice and check valve seat are clean.
(8)
Install a new ball check valve (6) and replace the retaining clip (5), screw (3), and washer (4).
(9)
Lubricate the two new O-rings (2 and 8) with petroleum jelly (item 21, Appendix E) and install them in
their respective grooves in the desiccant plate (7).
(10)
Remove the spring (10), spring seat (9), bolt (15), and cartridge shell (12). Discard the oil separator filter
(13), the two perforated plates (11), and desiccant material.
(11)
Insert a new perforated plate into the cartridge, cloth side up, and tap it firmly to the bottom (Cloth always
faces desiccant material).
(12)
Slide washer (14) and oil separator filter (13) over the cartridge bolt with the gasket surface next to the
shell (12).
(13)
Install the bolt with the oil separator into the bottom of the shell (12) and through center hole of the
perforated plate in the bottom of the shell.
4-386
|

