|
| |
TM 5-4210-220-12
4-22. AIR SYSTEM - Continued
4-22.12 Air Drier - Continued
d.
Purge Valve and Exhaust Diaphragm Repair -
Continued
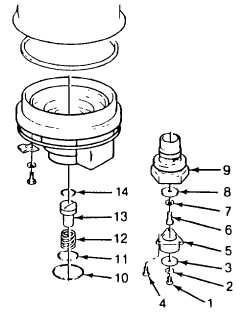
(5)
Remove the capscrew (6) which holds the
assembly together.
(6)
Separate capscrew (6), purge valve (8),
purge valve piston (13), and the piston
return spring (12).
(7)
Discard the piston O-ring (14), the purge
valve (8), and the piston return spring
(12).
(8)
Inspect all remaining parts. Be sure all
surfaces, bores, parts, and passages are
clean and dry.
(9)
Lubricate all new O-rings and piston bore
in hex cap nut (9) with petroleum jelly
(item 21, Appendix E).
(10)
Install O-ring (14) on piston (13).
(11)
Install the purge piston return spring (12) and piston (13) in hex cap nut (9).
(12)
Install the purge valve (8) In the cap nut so that the rubber portion rests on the metal seat of the cap nut.
(13)
Secure the valve to the piston using the screw (6) and lockwasher (7) and torque to 50 in. lb (5.6 Nm).
(14)
Install the two O-rings (10 and 11) on the hex cap nut (9).
(15)
Lubricate the cap nut threads and the cap nut bore of the end cover with petroleum jelly (item 21, Appendix
E). Install the cap nut, torquing it to 240 in. lb (27 Nm).
(16)
Secure the exhaust diaphragm (3) to the exhaust cover (5) using screw (1) and washer (2).
(17)
Secure the exhaust cover (5) to the hex cap nut (9) using screw (4).
(18)
Install end cover in drier as detailed in End Cover Repair, steps 7 thru 10, preceding.
e.
Thermostat and Heater Repair
NOTE
These may be repaired with drier on truck.
Ensure air tanks are drained prior to repair.
(1) Remove end cover as detailed in End Cover Repair, steps 1 thru 5, preceding.
4-384
|