|
| |
TM 5-4210-220-12
4-22 AIR SYSTEM - Continued
(3)
Install air lines A, B, and C
(4)
Start main engine and allow all air tanks to fill with air
(5)
Brush valve body and connectors with soap solution. No leakage is permitted. Tighten/replace
connectors as required.
(6)
Shut down main engine and drain primary air tank (left rear wheel well)
(7)
Restart main engine while monitoring cab primary air pressure gage. Check that as soon as ignition
switch is operated and prior to engine start, the primary air tank is pressurized to at least 50 psi (340 kPa)
as a result of the air starter valve operating.
(8)
Replace front wheel and cab skid plate if required
REPAIR
NOTE
The air starter valve can only be repaired if it is removed from the truck. See REMOVAL
preceding.
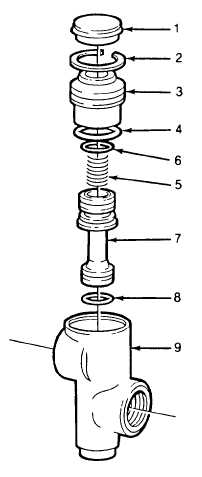
(1)
Pull off boot (1)
(2)
Push down on valve guide (3) and remove
retaining ring (2) Be aware that valve guide
is spring loaded
(3)
Remove valve guide (3) and push out
supply valve (7) and spring (5) from body
(9)
(4)
Remove and discard O-ring (4), supply
valve (7), retaining ring (2), and boot (1)
(5)
Clean
and
Inspect
all
remaining
components. Check for burrs, scuff marks
or
other
deterioration.
Replace
any
components failing inspection.
(6)
Coat all O-rings and sliding surfaces with
petroleum jelly (item 21, Appendix E).
(7)
Slide new supply valve (7) carefully into
body. Be sure lower O-ring (8) is not
scuffed as it passes the delivery port.
(8)
Install spring (5)
(9)
Install new O-ring (4) on valve guide (3)
and push carefully over supply valve and
into body. Retain with ring (2).
4-359
|

