|
| |
TM 5-4210-220-12
4-20. RADIATOR AND COOLING SYSTEM - Continued
(3)
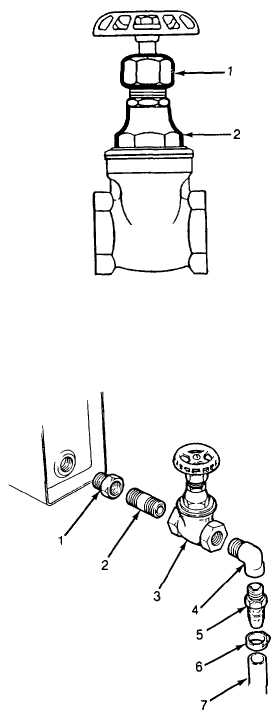
If the valve body seal leaks, tighten body nut (2)
until leak stops.
(4)
If leak does not stop, drain the radiator and either.
(a) remove valve body by unscrewing body nut
(2) and replace the body seal, or
(b) replace the valve, see below.
(5)
If tightening does not stop leaks or the valve seat
leaks, replace the valve. Drain radiator via the
valve. The cooling capacity is about 16 gal (60
L).
(6)
Remove pipe clamp (6) and drain hose (7).
(7)
Holding the valve body, unscrew the street elbow
(4) from the valve.
(8)
Remove valve handle and holding the reducer
bushing (7) unscrew valve (3). If nipple (2) is
removed with valve, remove nipple from valve.
(9)
Install nipple (2) and new valve (3) on reducer
bushing (1. ) Coat threads with pipe sealant (item
22, Appendix E) before installation.
(10)
Install elbow/barbed nipple assembly on valve
using pipe sealant (item 22, Appendix E) on
threads.
(11)
Install hose (7) and hose clamp (6) on barbed
nipple.
(12)
Refill radiator and start engine, top up radiator as
required. Be sure winterization valves on engine
are open.
(13)
Bleed air from the winterization heater inlet hose
(In the pump body). Top up radiator as required.
(14)
Replace radiator cap and allow engine to reach
working temperature. Inspect fittings for leaks.
Tighten fittings as required.
4-321
|