|
| |
TM 5-4210-220-12
4-20. RADIATOR AND COOLING SYSTEM - Continued
4-10.1 Radiator and Shutter Assembly - Continued
(10)
Loosen hose clamp (25) and pull lower hose
(26) from radiator connection.
(11)
Attach radiator lifting tool to the top of the
radiator upper tank.
WARNING
Serious injury could occur if heavy
equipment is moved/lifted without
sufficient personnel to do the job. Use
proper physical lifting procedures or
use a suitable lifting device. Wear
safety
shoes,
gloves
and
other
suitable protective clothing.
(12)
Attach overhead crane to radiator lifting tool eye, then take up crane slack DO NOT LIFT TRUCK..
(13)
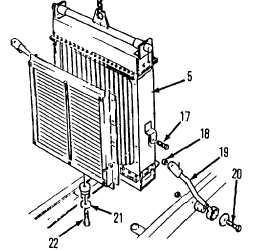
From underneath the truck, remove both capscrews (21) and washers (22).
(14) Lift radiator assembly (5) until it just clears rubber isolators, then carefully slide radiator assembly
forward enough until the fan clears shroud (23).
(15) Carefully continue to lift radiator assembly straight up through the top of the truck. Ensure air
hoses connected to shutter control (24) do not interfere during radiator removal. Once removed,
lower radiator to the ground.
INSTALLATION
(1)
Attach radiator lifting tool to the radiator (5) being installed in the truck.
WARNING
Serious injury could occur if heavy equipment is moved/lifted without sufficient personnel to
do the job. Use proper physical lifting procedures or use a suitable lifting device. Wear
safety shoes, gloves and other suitable protective clothing.
(2) Raise radiator assembly until it clears truck roof. Position radiator over engine compartment
slightly forward off the radiator isolators.
(3) Carefully lower radiator assembly (5) straight down into the engine compartment. Make sure the fan
clears the shroud (23) and the air lines attached to the shutter control do not interfere during installation.
(4)
Stop lowering the radiator assembly (5) just as it contacts the isolators.
(5)
Aline mounting holes in radiator with holes in isolators. Install capscrews (21) and washers (22).
4-316
|

