|
| |
TM 5-4210-220-12
4-19. WINTERIZATION SYSTEM-Continued
4-19.5 Winterization Heater-Continued
h.
Fuel Nozzle Assembly Repair - Continued
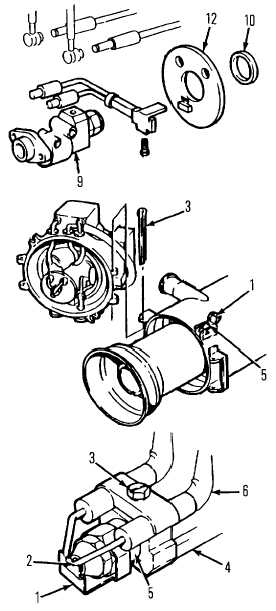
(7)
Install nozzle (9) in nozzle holder, making
sure circlip (10) is in position to hold disc
(12) in place when nozzle is tightened.
(8)
Reinstall burner assembly onto heater base
in the truck. Replace cotter pin (3).
(9)
Swing burner assembly onto heater, and
swing eyebolts (5) onto holder. Tighten
nuts (1).
(10)
Reconnect wiring harness to heater.
(11)
Reconnect fuel lines to heater.
j.
Ignition Electrodes Repair
NOTE
These can be replaced without
removing complete unit from truck.
(1)
Remove burner unit described in section h.
1 to 4.
(2)
To adjust the ignition electrodes no further
disassembly of unit is necessary.
(3)
Using the electrode adjust gage, (item 2,
Appendix G), aline the front edge of the
gage with the fuel nozzle (5). Adjust the
points of the ignition electrodes (2) so they
lay in the two grooves. Slight adjustment
may be made by bending electrodes (2).
For major adjustment loosen screw (3) and
adjust electrodes. Retighten screw (3).
(4)
To replace ignition electrodes, remove screw (3) and unplug electrodes from ignition leads (6).
Remove and replace electrodes through disc assembly. Adjust setting as described in step 3 preceding.
(5)
Reinstall burner assembly onto heater in the truck. Replace cotter pin.
(6)
Swing burner assembly onto heater and swing eyebolts onto holder. Tighten nuts.
(7)
Reconnect wiring harness to heater.
(8)
Reconnect fuel lines to heater.
4-306
|