|
| |
TM 5-4210-220-12
4-18. PUMP, PIPING, AND VALVES - Continued
4-18.17 Bumper Turret.
This task covers
a.
Removal
b.
Installation
c.
Repair
TOOLS
Shop Equipment, Automotive
Maintenance and Repair,
NSN 4910-00-754-0705
EQUIPMENT CONDITION
All Piping Drained
Main Engine Shutdown (see para. 2-10)
APU Shutdown (see para. 2-12)
Batteries Disconnected (see para. 4-24)
MATERIALS/PARTS
25, Appendix E Sealant
MS51922-1 Locknut 1/4"-20
MS51922-13 Locknut 5/16"-24
1227540 Bumper Turret
PERSONNEL REQUIRED - 2
REMOVAL
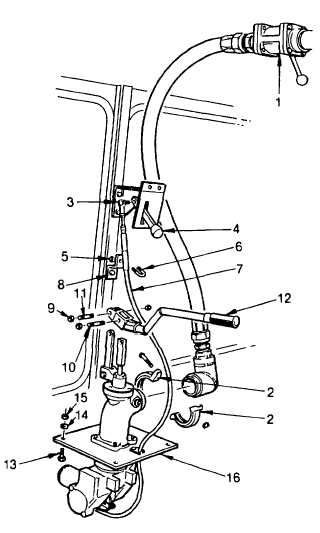
(1) Close the bumper turret ball valve (1).
(2) Remove victaulic coupling (2), see para. 4-
18.3.
(3) Remove cable end rod ball joint (3) from
control handle (4).
(4) Remove locknuts (5) and clamp (6) that
retain the cable (7) to the Z-bracket (8).
Discard locknuts.
(5) Remove the four locknuts (9) and two
studs (10, 11) that retain the handle
assembly (12) to the turret. Discard
locknuts.
(6) Remove four locknuts (15), flatwashers
(14), and capscrews (13) that retain the
mounting plate (16) to the cab turret
enclosure.
(7) While supporting the turret assembly,
break sealant bond between mounting
plate and the cab turret enclosure using a
flat screwdriver.
(8) Carefully lower bumper turret from cab
turret enclosure. It may be necessary to
turn bumper turret to allow the base to
clear the bumper turret hole.
4-276
|

