|
| |
TM 750-116
(2) Optical System.
(a)
2-5.a.
(b)
(c)
(d)
(e)
Perform purging and charging procedure para
Relief valve should open between 3-10 psig.
Purge instrument at 7 psig for 5 minutes.
Ensure relief valve closes between 1-5 psig.
Leak test for minimum of 5 minutes.
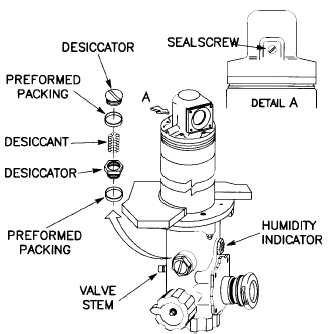
h. Panoramic Telescope, M901A1 (fig. 3–76).
NOTE
Purge panoramic telescope when the internal
optical surfaces are fogged over. Replace the
desiccant and two preformed packings every
time the unit is purged. Do not attempt to check
the pressure in the panoramic telescope at any
other time than during the pressurization cycle.
Loss of pressure resulting from such attempts
will shorten the time between maintenance
actions.
(1) Remove desiccator by unscrewing container part
(hex head) from telescope body.
(2) Hold container part upright and remove slotted cap
of desiccator.
(3) Discard old desiccant. Discard two preformed
packings from desiccator. Install desiccator.
Figure 3-76 Panoramic Telescope, M901A1
(4) Close nitrogen tank valve and pressure regulator
valve.
3-32
Contamination can damage the telescope.
Blow pressurized nitrogen through the
charging lines to remove contamination.
(5) Open tank supply valve and observe high pressure
gauge indicating that tank is pressurized.
(6) Remove lockwire and cap from valve stem.
The sealscrew is a captive screw and must
not be removed. Removal of the screw dam-
ages equipment.
(7) Install hose assembly on valve stem and loosen
setscrew.
(8) Adjust pressure regulator to 4-5 psig (28 to 34
kPa) as indicated on low pressure gauge.
(9) Verify nitrogen is being vented from sealscrew
hole and observe humidity indicator.
(10) Purge telescope until all sections of indicator are
blue. During purge, lubricate preformed packings lightly
with silicone compound.
(11) Close pressure regultor valve and tighten set-
screw.
(12) Remove dessicator from telescope body and refill
desiccator to level slightly below threads.
(13) Lightly lubricate preformed packing on top part
of desiccator with grease or silicone compound.
(14) Install top part of desiccator to bottom.
(15) Lightly lubricate preformed packing with grease
or silicone compound.
(16) Install desiccator on telescope body and tighten
to 20 to 30 in lb. (2.25 to 3.39 Nm).
(17) Slowly open pressure regulator valve and charge
instrument to 2.0 + or - .0.5 psig (14 + or - 3 kPa). Tighten
setscrew when pressure regulator gauge stabilizes.
(18) If overpressurization occurs, slowly open set-
screw, adjust pressure regulator to 2.0 + or - 0.5 psig; then
tighten setscrew when pressure regulator gauge stabilizes.
(19) Close pressure regulator gauge. Remove hose
assembly and replace cap on nut of valve and install lock-
wire.
(20) Close tank supply valve and verify on high pres-
sure gage.
|