 |
|||
|
|
|||
|
Page Title:
Table 1. Impeller Clearance Settings |
|
||
| ||||||||||
|
|
 TM 55-1925-292-14&P
0037 00
27. Remove the impeller wrench from the shaft (figure 1, item 11).
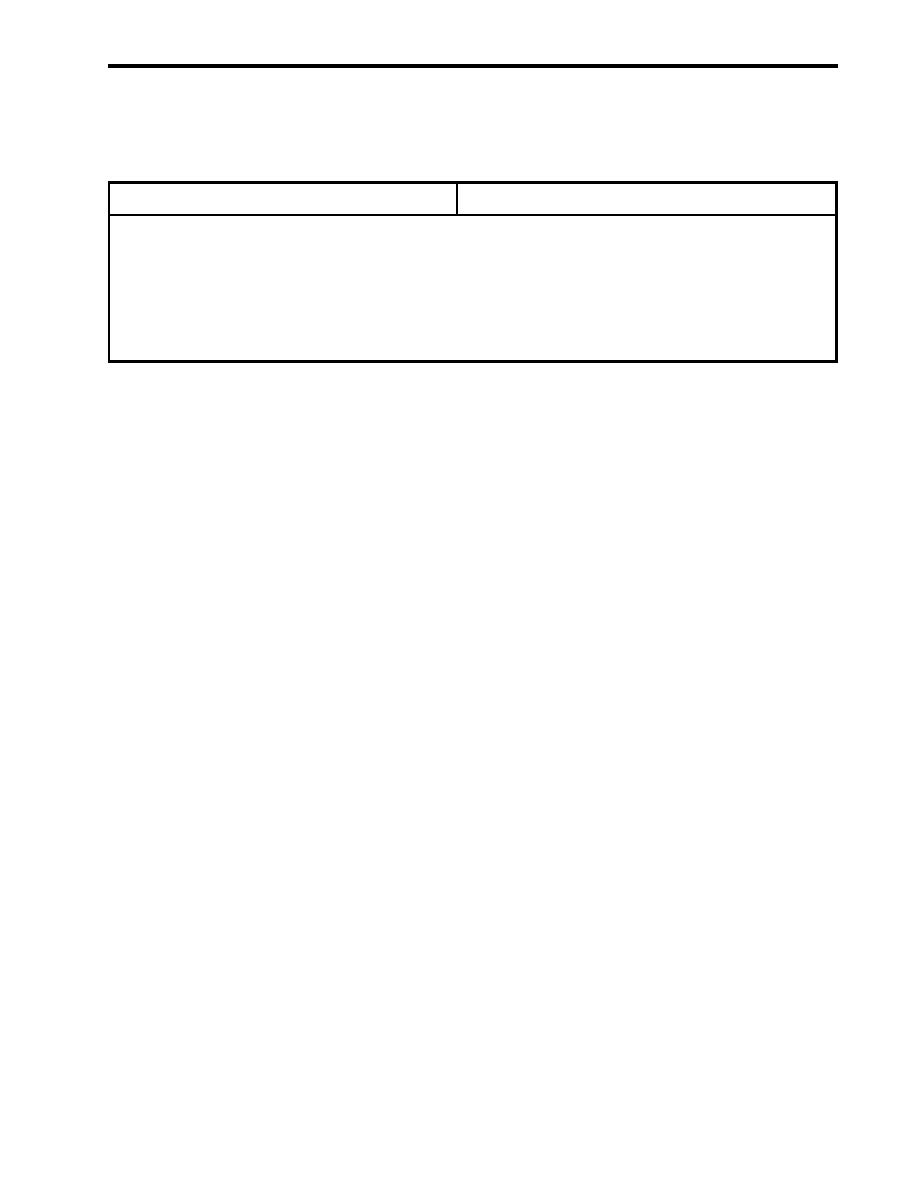
28. Determine the proper impeller clearance using table 1.
Table 1. Impeller Clearance Settings
Temperature F (C)
Clearance to casing in (mm)
< 200 (93) .................................................................................................... 0.018 0.003 (0.46 0.08)
200 to 250 (93 to 121) ......................................................................................................... 0.021 (0.53)
251 to 300 (122 to 149) ....................................................................................................... 0.024 (0.61)
301 to 350 (150 to 176) ....................................................................................................... 0.027 (0.69)
351 to 400 (177 to 204) ....................................................................................................... 0.030 (0.76)
401 to 450 (205 to 232) ....................................................................................................... 0.033 (0.84)
> 450 (232) .......................................................................................................................... 0.036 (0.91)
NOTE
Rotating the shaft and the bearing carrier at the same time will accurately determine
the zero setting.
29. Set the impeller at the zero setting by turning the bearing carrier (figure 1, item 22) counterclockwise until the
impeller (figure 1, item 13) comes into light rubbing contact with the rear cover plate (figure 1, item 17).
NOTE
Rotating the bearing carrier the width of one of the indicator patterns cast into the
bearing carrier moves the impeller axially 0.004 in (0.1 mm). The impeller will move
0.002 in (0.05 mm) closer to the rear cover plate when the setscrews are tightened.
Take this measurement into consideration when setting the impeller clearance.
30. Determine how far to rotate the bearing carrier (figure 1, item 22) by dividing the desired impeller clearance
(table 1) by 0.004 in (0.1 mm).
31. Turn the bearing carrier (figure 1, item 22) clockwise to obtain the proper impeller clearance (table 1).
NOTE
Tightening the setscrews will cause the impeller to move 0.002 in (0.05 mm) closer to
the rear cover because of the internal looseness in the bearing carrier threads. This
should be considered when setting the impeller clearance.
32. Tighten the three setscrews (figure 1, item 21) in the bearing carrier (figure 1, item 22) to a torque of 30 lb-ft
(41 Nm).
33. Slide the mechanical seal gland (figure 1, item 16) and the mechanical seal (figure 1, item 20) towards the
rear cover plate (figure 1, item 17).
34. Install the four gland nuts (figure 1, item 15) on the mechanical seal gland (figure 1, item 16) and torque the
four nuts to 5 lb-ft (6.8 Nm).
35. Tighten the setscrew (figure 1, item 19) in the mechanical seal (figure 1, item 20).
36. Install a new rear cover gasket (figure 1, item 10) on the pump casing (figure 1, item 9).
37. Install the pump casing (figure 1, item 9) on the bearing housing adapter (figure 1, item 8).
0037 00-9
|
|
Privacy Statement - Press Release - Copyright Information. - Contact Us |
