|
| |
TM 5-4210-233-14&P-1
5-22.
BLOWER REPAIR - Continued
(3) Check the oil seal rings, carriers and collar for wear or scoring. If worn excessively, they must be
replaced. The current oil seal rings are chrome flashed and the carriers are liquid nitrided. When
replacement of an oil seal ring or carrier is neccessary, both parts must be replaced together.
(4) Inspect the inside surface of the blower housing for burrs or scoring. The inside surface must be
smooth for efficient operation of the blower. If the inside surface of the housing is slightly scored or
burred, it may be cleaned up with emery cloth (Item 25, Appendix E).
(5) Examine the rotor shaft serrations for wear, burrs or peening. Also inspect the bearing and oil seal
contact surfaces of the shafts for wear or scoring.
(6) Inspect the inside surface of the blower housing for burrs or scoring. The inside surface must be
smooth for efficient operation of the blower. If the inside surface of the housing is slightly scored or
burred, it may be cleaned up with emery cloth (Item 25, Appendix E).
(7) Check the finished ends of the blower housing for flatness or burrs. The end plates must set flat
against the blower housing. The finished inside face of each end plate must be smooth and flat. If
the finished face is slightly scored or burred, it may be cleaned up with emery cloth (Item 25,
Appendix E).
NOTE
Be careful not to remove metal at the joint face
between the end plates and the housing. Air or oil
leaks could develop after assembly.
(8) Inspect both timing gears at teeth and at bore splines for
chips or nicks.
(9) Inspect oil holes. If clogged, clean with dry cleaning
solvent (Item 3, Appendix E).
c.
Assembly.
NOTE
Do steps (1) through (4) for all four ring carriers.
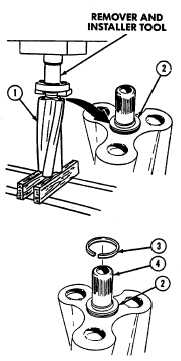
(1) Support rotor (1) on blocks.
(2) Apply lubricating oil (Item 10, Appendix E) inside ring
carrier (2).
(3) Install ring carrier (2) tight to rotor (1) with large side
facing rotor using remover and installer tool.
CAUTION
Do not spread oil seal rings too much when install-
ing or rings will break.
5-130
|