|
| |
TM 5-4210-233-14&P-1
5-16. FUEL PUMP-Continued
(3)
Inspect valve (17). If valve is lightly scored, use crocus cloth to remove marks. If marks cannot
be removed with crocus cloth, replace valve.
d.
Assembly.
WARNING
Adhesives, solvents, and sealing compounds can burn easily,
can give off harmful vapors, and are harmful to skin and
clothing. To avoid injury or death, keep away from open fire and
use in well-ventilated area. If adhesive, solvent, or sealing
compound gets on skin or clothing, wash immediately with soap
and water.
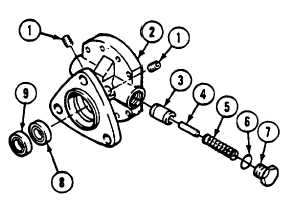
(1)
Coat threads of two pipe plugs (1) with
pipe thread sealing compound (Item 2,
Appendix E) and install in fuel pump
housing (2).
(2)
Mount fuel pump holder in vise and
install fuel pump housing (2) on holder.
(3)
Lubricate valve (3) with lubricating oil
(Item 10, Appendix E) and install
valve, pin (4), spring (5), new gasket
(6), and plug (7) in housing (2). Torque
plug to 20 lb ft (27 N·m).
(4)
Lubricate two new oil seals (8 and 9)
with lubricating oil (Item 10, Appendix
E).
(5)
Set fuel pump housing (2) on top of two
wooden blocks.
NOTE
Install new seals with lips pointing in same direction.
(6)
Install inner oil seal (8) on pilot (pin) of oil seal installer. Install inner oil seal (8) in housing (2). Tap
seal until seated.
(7)
Install adapter on tool.
(8)
Install outer oil seal (9) on pilot of oil seal installer. Install outer oil seal in housing (2). Tap seal
until seated.
(9)
Lubricate two shaft and gear assemblies (10 and 11) with lubricating oil (Item 10, Appendix E).
Install assemblies in housing (2).
CAUTION
When
applying
adhesive-sealant
(Item
35,
Appendix E) to pump cover, insure no sealant gets
into
gear
compartment.
Sealant
in
gear
compartment can damage equipment.
5-93
|