|
| |
TM 5-4210-233-14&P-1
4-37. Y-STRAINER AND 1-1/2" CHECK VALVE - Continued
b.
Disassembly.
(1)
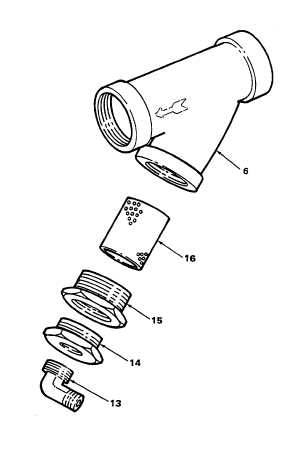
Remove elbow (13), reducer (14), cap (15) and
screen (16) from Y-strainer body (6).
c.
Cleaning and Inspection.
(1)
Clean any debris from y-strainer body (6), screen
(16) and fittings (13, 14, and 15).
(2)
Inspect y-strainer body (6) for cracks. Replace
valve body if damaged.
(3)
Inspect screen (1 6) for rust or corrosion. Replace
if required.
d.
Assembly.
(1)
Coat all pipe threads with pipe sealant (Item 2,
Appendix E).
(2)
Install screen (16) in cap (15). Install cap (15) in
Y-strainer body (6).
(3)
Install reducer (14) and elbow (13).
e.
Installation.
(1)
Coat all pipe threads with pipe sealant (Item 2,
Appendix E).
NOTE
Be sure 1-1/2" check valve (10) is installed with pipe cap
facing up and arrow pointing towards elbow (8).
(2)
Install elbow (12), nipple (11), 1-1/2" check valve (10), nipple (9), elbow (8) and nipple (7).
(3)
Install Y-strainer (6) on nipple (7).
(4)
Install U-bolt (5), lockwasher (4) and nut (3).
(5)
Install drain hose (2).
(6)
Install pipe (1) in Y-strainer (6).
f.
Follow-on Maintenance.
(1)
Install foam valve (see para 4-41).
(2)
Install curbside panel (see para 4-26).
(3)
Connect batteries (see para 4-114).
4-207
|