|
| |
TM 5-4210-233-14&P-1
5-77. APU INJECTION NOZZLE - Continued
c.
Cleaning.
(1)
Soak each nozzle in solvent (Item 3, Appendix E)
fuel to loosen dirt. Then clean the inside with a
small strip of wood soaked in oil (Item 10, Appendix
E) and the spray hole with a wood splinter. If
necessary, clean the outer surfaces of the nozzle
body with a brass brush, but do not attempt to
scrape carbon from the nozzle surfaces. This can
severely damage the spray hole. Use a soft oil-
soaked rag or mutton tallow and felt to clean the
nozzle valve. Use nozzle cleaning kit (Appendix B,
Section III, Item 92).
d.
Assembly.
(1)
Rinse both the valve and nozzle thoroughly before assembly and coat with oil (Item 10, Appendix
E). The valve must be free in the nozzle. Lift it about 1/3 out of the body. It should slide back to its
seat without aid when the assembly is held at a 45° angle. If necessary, work the valve into its
body with clean mutton tallow.
(2)
Remove all pressure on the nozzle spring by adjusting the pressure adjusting screw.
(3)
Clamp the nozzle holder body in a vise.
(4)
Set the valve in the body and set the nozzle over it.
(5)
Install the nozzle cap nut loosely.
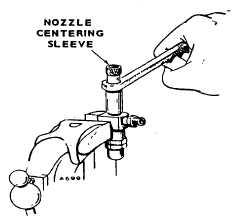
(6)
Place the centering sleeve over the nozzle for initial tightening. Then remove the centering sleeve
to prevent it from binding between nozzle and cap nut and tighten the nozzle cap nut to 50-55 ft Ibs
(68 to 74 N.m).
e.
Adjustment.
(1)
Remove cap nut over the adjusting screw of the nozzle and install the nozzle on a static free
nozzle tester (Appendix B, Section III, Item 91).
(2)
Adjust the opening pressure to 1,750 psi (12,058 kPa) by turning the adjusting screw.
f.
Installation.
(1)
Assemble three new gaskets (9, 10, 11) and shield (1 2) on nozzle (7) and install in holder (8).
(2)
Install nozzle and holder (5) with flange (4), two flatwashers (3), and two capscrews (2). Torque
capscrews to 20-21 ft Ibs (28-29 N.m).
(3)
Install two fuel lines (1 and 2) on nozzle and holder (5) and pump (6).
(4)
Install nozzle cover, housing cover, four capscrews and four lockwashers.
(5)
Install air housing door and secure with door screw.
g.
Follow-on Maintenance.
(1)
Connect batteries (see para 4-114).
5-401
|