|
| |
TM5-4210-229-14&P
6-12. PISTON AND CONNECTING ROD MAINTENANCE (Continued).
CAUTION
It is advisable to wrap an oil-soaked cloth
around the crankshaft connecting rod
bearing journals to keep them as clean as
possible. Wrap the piston and connecting
rod assemblies in clean cloth also to protect
them until installation.
b. Remove the connecting rod bolts from the rod
caps and remove the caps and bearing inserts
from the rod ends. Keep in order and observe
markings to prevent mismatching.
c. Push the connecting rod and piston to the top of
the cylinder and remove them from the top of
the crankcase with extreme care.
d. Crank the engine by hand and remove all of the
remaining pistons as outlined. Be sure to re-
place each bearing cap on its respective con-
necting rod after removal of the piston from
the engine.
e. Cylinder sleeve removal.
(1) After piston and rod removal use the uni-
versal wet sleeve puller and remove cylin-
der sleeves.
(2) Position the puller in the sleeve. Hold the
jaws of the puller and turn the screw, which
spreads the jaws to grip the edge of the
cylinder sleeve. Tighten the locking bar
against the top of the sleeve.
(3) Turn the bearing-mounted forcing nut to
break the cylinder sleeve loose from the
crankcase.
CAUTION
If more than one sleeve is to be removed and
they are to be used again, it is important that
the sleeves be marked with the cylinder num-
ber they were removed from.
(4) Remove the sleeve; if necessary thread a
slide hammer into the forcing screw to aid in
removal.
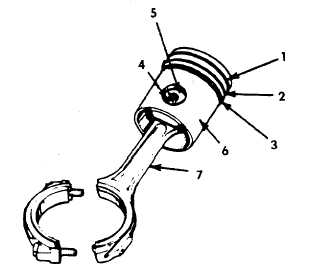
f. Connecting rods, pistons and rings disassembly.
(1) Remove the piston rings (1, 2, and 3) with a
piston ring expander. Remove the top com-
pression ring first then the remaining rings
in order.
(2) Remove the piston pin retainers (4) from
each piston.
CAUTION
Do not apply excessive force to the piston pin.
It is recommended that the piston be heated in
water to 160°-180° F (71°-82° C) if the pin
cannot be removed by hand when cold.
(3) Remove the piston pin (5) by hand.
(4) After the pin is removed, separate the pis-
ton (6) from the connecting rod (7). Tag or
mark the piston and parts with the number
of the bore from which they were taken, so
they may be reinstalled in their respective
cylinders once inspected and/or repaired.
6-29
|