|
| |
TM5-4210-229-14&P
5-20. COMPRESSOR REPAIR (Continued).
t.
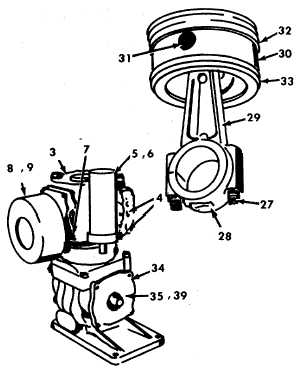
Remove piston rings (32 and 33)from the piston
with a ring expander.
u.
Remove four bolts (34) securing the bearing cap
(35) to the crankcase (1).
Do not attempt to pry bearing cap from the
crankcase.
v.
Tap the cap (35) gently with a plastic mallet to
loosen and remove cap.
w.
Remove bearing (36).
Cleaning solvent (Appendix D, Item 54) is
both toxic and flammable. Keep off skin.
Use only in a well-ventilated area and
avoid prolonged breathing of vapors.
Keep away from open flames.
Compressed air used for cleaning or
drying can create airborne particles that
may enter the eyes. Pressure shall not
exceed 30 psi (206 kPa). Wearing of
goggles is required to avoid injury to
personnel.
Never use gasoline, fuel oil or kerosene as a
cleaning solvent.
Be extremely careful to avoid scratching
machined surfaces.
x.
Wash all parts in cleaning solvent (Appendix D,
Item 54). Blow dry with compressed air.
y.
Clean carbon deposits from the cylinder head's
interior surfaces. Clean all interior air and water
passageways.
z.
Remove carbon from piston crowns and ring
grooves. Carbon in ring grooves can be
removed by using a piece of a broken ring as a
tool.
Compressed air used for cleaning or
drying can create airbore particles that
may enter the eyes. Pressure shall not
exceed 30 psi (206 kPa). Wearing of
goggles is required to avoid injury to
personnel.
aa. Blow out all drilled passageways with com-
pressed air to insure they are open.
bb. Remove old gasket material sealer from gas-
ket surfaces.
Removal of crankshaft may cause main
bearing damage. Therefore, inspection
while assembled is recommended.
cc. Examine components for wear, cracks, dam-
aged threads, nicks, scoring and pitting.
dd. Check piston to bore clearance. If clearance
exceeds .008 inch, (.2 mm) the piston (30) and
rod (28) assembly must be replaced.
ee. Check tolerances of components in accordance
with Table 5-2. If components do not measure
within the limits listed, they must be re-
placed.
5-45
|