|
| |
TM5-4210-229-14&P
4-91. DIPSTICK AND DIPSTICK TUBE REPLACEMENT
This task covers:
a. Removal
b. Installation
INITIAL SET-UP
Tools
General Mechanics Tool Kit
Materials/Parts
Oil Pan (1801398C91)
RTV Sealant (Appendix D, Item 45)
Gasket (671827C1)
Plug Gasket (59658D)
Oil (Appendix D, Item 37)
Solvent (Appendix D, Item 54)
General Safety Instructions
Engine OFF.
Transmission in N) neutral.
Parking brake set.
Batteries disconnected.
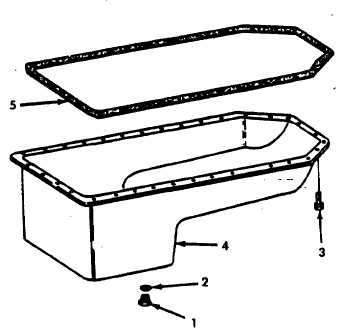
REMOVAL
a.
Remove drain plug (1) and gasket (2) and
drain oil into catch basin.
b.
Remove bolts (3) securing oil pan (4) to crank
case.
c.
Remove oil pan (4) and gasket (5).
Cleaning solvent (Appendix D, Item
54) is both toxic and flammable.
Keep off skin. Use only in a
well-ventilated area and avoid pro-
longed breathing of vapors. Keep
away from open flames.
d.
Remove all old gasket and RTV sealant from
the oil pan and engine block with cleaning sol-
vent (Appendix D, Item 54).
INSTALLATION
NOTE
Only a small amount of sealant is required. Excessive
amounts of sealant may prevent proper sealing of the
oil pan.
a.
Apply a 3/16 inch (5 mm) bead of RTV sealant
(Appendix D, Item 45) to the oil pan sealing
surface inboard of the bolt holes.
NOTE
The sealer must be wet to the touch when the oil pan
is installed.
b.
Install the oil pan gasket (5).
c.
Install the oil pan (4) to the engine with the oil
pan bolts (3).
d.
Install new drain plug gasket (2) and install
drain plug (1).
e.
Fill engine with oil (Appendix D, Item 37).
f.
Connect battery cables.
4-105
|