 |
|||
|
|
|||
|
|
|||
| ||||||||||
|
|
 TM5-4210-224-14&P
4-114. OIL PAN REPLACEMENT. (Continued)
REMOVAL
a.
Raise the vehicle.
b.
Drain the engine oil (paragraph 4-9).
c.
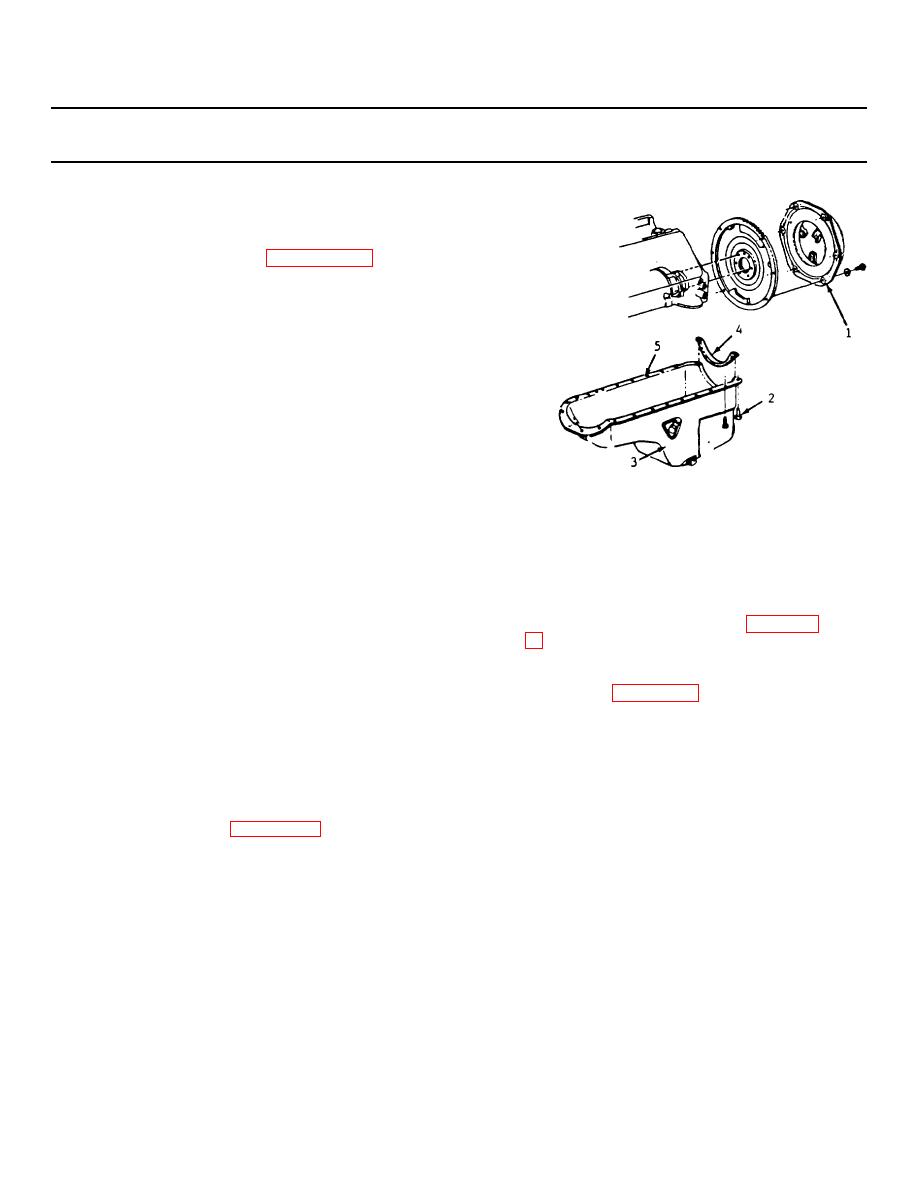
Remove the flywheel cover (1).
d.
Remove the left front engine mounting
through-bolt.
CAUTION
When raising or supporting the engine
for any reason, do not use a jack under
the oil pan, sheet metal, or crankshaft
pulley. Due to the small clearance
between the oil pan and the oil pump
screen, jacking against the oil pan may
cause it to be bent against the pump
screen, resulting in a damaged oil
pickup unit.
NOTE
e.
Raise the engine.
Clean all old RTV from the oil pan and
block. Clean all oil and grease from the
f.
Remove the oil pan bolts (2).
gasket surfaces using solvent (Appendix
g.
Remove the oil pan (3).
a.
Apply a 3/16 inch (5 mm) bead of RTV
h.
Remove the oil pan rear seal (4).
Sealant (Appendix D, Item 37) to the oil pan
sealing surface (5) inboard of the bolt holes.
INSTALLATION
NOTE
WARNING
The sealer must be wet to the touch
when the oil pan is installed.
Cleaning solvent, Appendix D, Item 44,
b.
Install the oil pan rear seal (4).
is both toxic and flammable. Keep off
skin. Use only in a well-ventilated area
c.
Install the oil pan (3) to the engine with the oil
and avoid prolonged breathing of
pan bolts (2).
vapors. Keep away from open flame.
4-159
|
|
Privacy Statement - Press Release - Copyright Information. - Contact Us |
