|
| |
TM 5-4210-220-34
2-11.
HOSE BODY - Continued
2-11.3
Compartment Boxes - Continued
NOTE
Apply sealant (item 25, Appendix B) to all metal mating surfaces, prior to installation.
(5)
Attach sling to hose bed assembly. Lift hose bed assembly and lower onto compartment boxes. The
front and rear panel assembly must be in place and attached; see c. and d. following.
(6)
Attach hose bed assembly to left and right compartment tops, and front and rear panels using lockbolts
and collars. If compartment boxes are new, use hose bed as a drill template. If front or rear panel
supporting angles are new, use hose bed as a drill template.
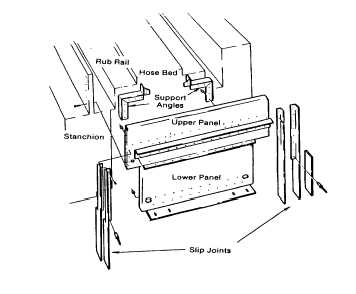
c.
Front Panel Assembly Repair
NOTE
Remove front panel assembly as a complete unit. If
front panel assembly requires repair, remove
components as necessary. If hose bed has been
removed prior to front panel assembly removal, the
lockbolts that secure the hose bed to the support
angles have already been removed.
(1)
Remove lockbolts that attach upper and
lower panels to the left and right
compartment boxes. Remove lockbolts
that attach the upper panel to the
stanchion on the right hand side.
(2)
Remove lockbolts that retain the slip joints
to the upper panel. This will leave slip
joint attached to compartment box.
(3)
Separate front panel from compartment
assemblies.
NOTE
Apply sealant (item 25, Appendix B) to all metal mating surfaces, prior to installation.
(4)
To install front panel assembly make sure all fasteners are in position and tight.
(5)
Lift front panel assembly so that it is positioned between compartment sides, and level with rub rail.
Make sure front panel angles will mate with hose bed.
(6)
Secure front panel assembly to left and right hand compartments using lockbolts.
2-58
|