|
| |
TM 5-4210-220-34
3-8.
ENGINE - Continued
(4)
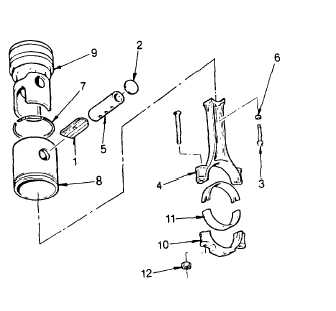
Push rod/piston assembly out through the top of cylinder block.
NOTE
Piston cannot be removed from the bottom of block. Piston/rod assembly component parts should be
marked during disassembly to ensure that mating parts are reassembled together.
(5)
Secure rod/piston assembly in soft jawed
vise with piston skirt (8) resting on jaws of
vise. Using tool J8128, remove all piston
rings and discard.
(6)
Punch a hole through the center of one of
the piston pin retainers (2). Pry retainer
from piston. Be careful not to damage
piston or bushing. Remove other retainer.
(7)
Loosen the two bolts (3) which secure
connecting rod (4) to piston pin (5).
Remove assembly from vise. Place on
bench and remove bolts (3) and spacers (6)
and remove connecting rod (4).
(8)
Tape together and tag upper and lower
bearing shells for inspection later and for
proper sizing during installation. Always
replace bearing shells during assembly.
(9)
Install cap on connecting rod. Snug
retaining nuts to connecting rod bolts.
Piston, Liner, Rings, Rod and Rod
Bearings.Tag rod assembly for inspection.
(10)
Remove
piston
pin
(5)
from
piston
assembly.
Avoid personal injury when disassembling piston. Keep fingers out of piston pin hole area. Wear safety shoes.
(11)
Grasp piston assembly by skirt area, bring piston assembly down on tool J33048 in the pin area of piston with
sufficient force to separate the crown (9) from the skirt (8)
(12)
Remove seal ring (7) from piston crown.
3-163
(13)
Remove piston pin bushing (1).
3-163
|