|
| |
TM 5-4210-220-34
3-7 .
TRANSMISSION - Continued
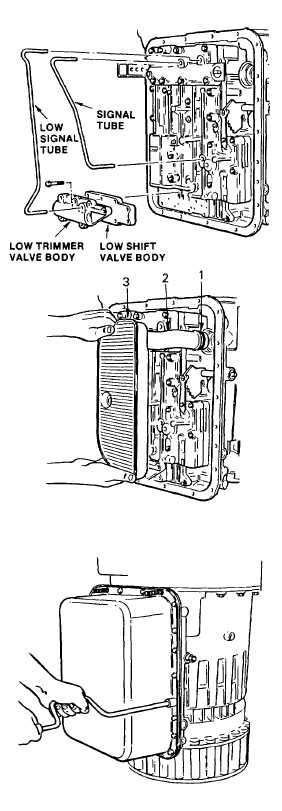
(7)
Install the low shift valve body onto the
lower guide screw. Retain the body
with one 1/4 20 X 2 3/4 in. bolt.
Tighten the bolt to 10 ft lb (13 Nm).
(8)
Install the low trimmer valve. Install six
1/4 20 X 4 in. bolts to retain the trimmer
valve. Tighten the bolts to 10 ft lb (13
Nm).
(9)
Install the signal tube. The signal tube
must be installed into lockup cutoff
valve into the hole near the center of
the valve body. The hole near the end
of the valve body must remain open.
(10) Install low signal tube from low trimmer
valve to lockup cutoff valve.
at.
Installation Oil Filter And Oil Pan
(1)
Lubricate and install seal ring (1) onto
the neck of the intake tube (2) on the
oil filter (3).
(2)
Install the oil filter (3) so the intake tube
and seal ring fit squarely and snugly
into the transmission housing. Do not
twist the oil filter during installation,
push straight inward. Retain oil filter
with one 5/16 18 X 2 3/4 in. bolt, 5/16
plain washer and spacer. Tighten bolt
to 20 ft lb (27 Nm).
(3)
Install two 5/16 18 X 3 in. guide screws
J3387-2 into the transmission housing.
CAUTION
If adhesives or sealers are required to retain the
oil pan gasket, they may be applied onto the pan
mounting flange, but only in the area outside the
flange bed.
(4)
Install a new oil pan gasket over the
guide screws. Aline all holes in
the gasket with those in the
housing.
(5)
To install the oil pan, use twenty-three
5/16 18 X 5/8 in. bolts. Alternately
tighten each bolt, 180 deg. apart, to
approximately half the specified torque.
Final torquing should be 20 ft lb (27
Nm). Pan bolts must retain a minimum
of 5 ft lb (7 Nm) after gasket set to
prevent leakage.
3-82
|