|
| |
TM 5-4210-220-34
3-7.
TRANSMISSION - Continued
(8)
Roll up the seal ring to about half its free diameter and hold it that way for about 10 seconds. Being
careful not to spread the seal ring more than necessary, slide it onto the hub. Place one end of the seal
ring into the groove and gradually work the seal into the groove.
(9)
Install the butt-joint seal rings onto the front support hub.
(10) Attach a lifting sling to the converter housing. Raise the converter housing assembly above the
transmission in the vertical position.
(11) Install two 1/2 13 X 2 3/8 in. guide screws J1126, one in the converter housing and one in the
transmission housing.
(12) Install two # 10 32 X 6 in. guide screws J6889-1 into the pitot tube. Exit port of pitot tube must face
toward guide bolts. Ins-all the pitot tube and guide bolts so that the guide bolts enter the screw holes in
the converter housing, and entrance port of pitot tube faces outward (toward pitot collector ring).
(13) Install the converter housing onto the transmission housing, using care to avoid damage to the pitot tube
and the collector ring.
(14) Install two 1/2 13 X 2 1/4 in. self-locking bolts, with flat washers, into the recessed holes in the mounting
pad (at the 8 o’clock position, viewed from front of transmission. Tighten the bolts to 97 ft lb (132 Nm).
(15) Into the next bolt hole, counterclockwise, install a 1/2 13 X 2 1/2 in. bolt, with a lockwasher. Tighten the
bolt to 80 ft lb (108 Nm).
(16) Install 1/2 13 X 3 3/4 in. bolt, with lockwashers, at the 5 o’clock position. Install three 1/2 13 X 2 1/8 in.
bolts, with lockwashers, into the remaining holes. Tighten the bolts to 80 ft lb (108 Nm).
(17) Install the pitot tube screws and washers as each guide bolt is removed. Tighten the screws to 48 in. lb
(5 Nm).
(18) Install eleven 1/2 13 X 2 in. bolts, with lockwashers through the front flange of the transmission housing,
into the rear of the converter housing. Some bolt holes may be blocked by mounting fixture. Install
bolts when removed from fixture. Tighten the bolts to 80 ft lb (108 Nm).
aq.
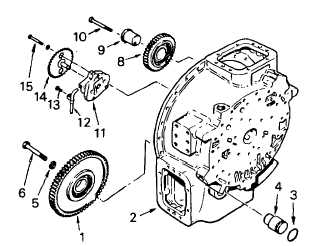
Installation PTO Drive Assemblies And
Scavenge Pump
(1)
Install gear assembly (1) into the
converter housing (2). Install seal ring
(3) onto spindle (4). Coat the spindle
with petroleum jelly (item 21, Appendix
B). Aline the gear with the spindle
bore in the housing. Install spindle (4)
by driving it forward with a soft mallet
until its larger diameter seats against
the inner race of the bearing in the
gear. Install lockwasher (5) and the
1/2 20 X 3 3/4 in. bolt (6) to retain the
spindle. Tighten the bolt to 100 ft lb
(136 Nm).
3-79
|