|
| |
TM 5-4210-220-34
2-13.
FIRE PUMP - Continued
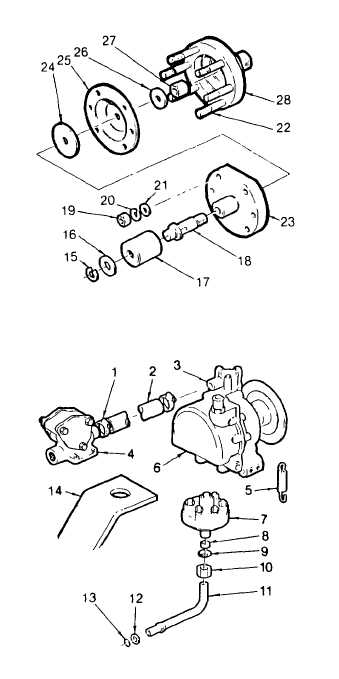
(10) Examine
diaphragm(25)
for
splits,
or
deterioration.
(11) Remove damaged diaphragm (25) from
plunger (18) by removing nut (27) and
washer (26). Make sure to remove
diaphragm plate (24), located on diaphragm
cover (23) end of plunger. Pull plunger from
diaphragm cover.
(12) Inspect diaphragm cover and housing for
cracks, excessive corrosion, or warped
mating surfaces.
(13) Inspect diaphragm housing for stripped
threaded
holes,
and
stripped
water
connection threads.
(14) Inspect
diaphragm
cover
for
oblong
plunger hole.
(15) Examine plunger for excessive wear or
corrosion.
(16) Evidence of damage of any kind is cause for
rejection. Replace component or assembly
as required.
(17) Install plunger (18) into diaphragm cover
(23).
(18) Slide diaphragm plate (24) onto plunger
(18).
(19) Install new diaphragm (25) and washer (26).
Apply a thin coating of pipe sealant (item 22,
Appendix B) to plunger threads. Thread nut
(27) onto plunger and tighten to 24 ft lb (33
Nm).
(20) Aline diaphragm (25) and diaphragm cover
(23)
mounting
holes.
Carefully
slide
diaphragm onto diaphragm housing studs
(22). Secure diaphragm cover to diaphragm
housing
using
flat
washers
(21),
lockwashers (20), and nuts (19). Torque
nuts to 24 ft lb (33 Nm).
(21) Position plastic cap (17) and washer (16) on
diaphragm cover (23) and lock in position
with circlip (15).
(22) Thread disengaging unit (7) into bracket
(14).
(23) Install washer (12) and new O-ring (13) onto
lift-off pipe (11). Position lift-off pipe in
pump head pressure socket.
2-117
|