|
| |
TM 5-4210-220-12
4-30. REAR AXLE - Continued
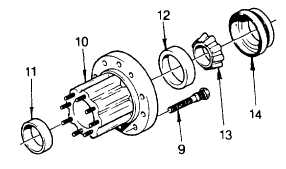
(6)
Install outer locknut (3) and tighten to a torque of 260 ft lb (350 Nm).
(7) Repeat wheel rotation in both directions. Rotation should be free with an end play of 0.001 to 0.010 in.
(0.03 to 0.25 mm).
(8)
When adjustment is complete, secure locknuts by bending a tab on lockwasher (4) over a flat on each
locknut (3 and 5).
(9)
Install axle shaft as detailed in para. 4-30.2.
REPLACEMENT
(1)
Relieve parking brake pressure and adjust
slack
adjuster
to
provide
clearance
between brake shoes and brake drum,
see para. 4-30.4, ADJUSTMENT, step 3.
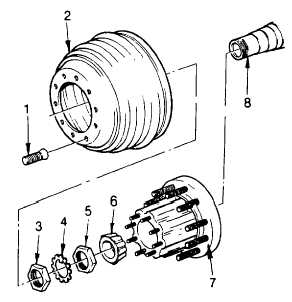
(2)
Remove inner wheel nuts (1) and remove
brake drum (2).
(3)
Straighten locking tabs on lockwasher (4)
and remove outer locknut (3), lockwasher
(4), and inner lock nut (5).
(4)
Remove outer bearing (6) from spindle (8)
and remove complete hub assembly (7).
(5)
Remove oil seal (14) from inner bearing in
hub assembly.
(6)
Inspect spindle (8) for damage. Minor
nicks and burrs may be removed but
otherwise no repair should be done. If
spindle
is
seriously
damaged,
the
complete axle housing must be replaced.
(7)
Inspect hub assembly. If badly damaged
or cracked or bearing cups cannot be
removed (see step 8) replace hub
assembly.
(8)
If bearings require replacement, replace
bearing and bearing cups. Remove cups
from hub using a suitable press.
(9)
If new hub is used, press bolts (9) in hub
(10).
NOTE
Use left hand threaded bolts (9) in
left hub and right hand threaded
bolts in right hub.
4-563
|