|
| |
TM 5-4210-220-12
4-25. STEERING SYSTEM - Continued.
c.
Steering Wheel Replacement
(1)
Place a piece of tape on the steering wheel rim and aline
a piece of tape on the instrument panel.
(2)
Remove horn button assembly. See steps 1 and 2 of a
preceding.
(3)
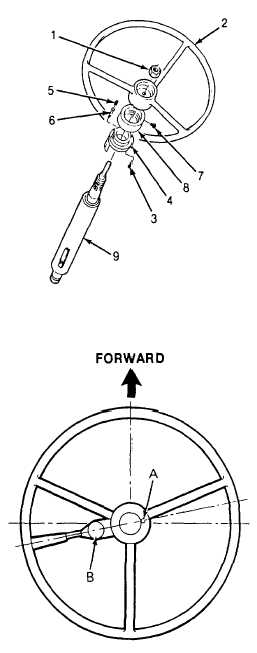
Remove steering wheel nut (1) and steering wheel (2).
Removal of steering wheel may require use of a puller.
NOTE
If new steering wheel is to be installed, carry out
steps 4 thru 9. Otherwise proceed to step 10 to
install original steering wheel.
(4)
Remove screws (3) and turn signal ring (4). Retain spring
(5) and plunger (6).
(5)
Loosen setscrew (7) and remove self-canceling ring (8).
(6)
Inspect turn signal ring and self-canceling ring. Replace if
damaged or defective.
(7)
Install self-canceling ring on new steering wheel and
tighten setscrew (7) securely.
(8)
Preassemble spring (5), plunger (6), and turn signal ring
(4).
(9)
Install turn signal ring assembly (4) on self-canceling ring
(8) using screws (3).
(10)
Position steering wheel on column as shown. Be sure the
cancel arm (A) is positioned 180 deg. opposite the turn
signal switch (B). If necessary, loosen setscrew (7) and
reposition self-canceling ring (8). Be sure tape on wheel
rim and instrument panel are alined.
(11)
Apply threadlock liquid (item 29, Appendix E) to steering
wheel nut (1). Install nut and tighten to 70 ft lb (310 Nm).
(12)
Install horn button assembly. See Horn Button Assembly
Replacement preceding (steps 3, 4, and 5 ).
4-469
|