|
| |
TM 5-4210-220-12
4-24. ELECTRICAL SYSTEM - Continued
4-24.9 Headlight
This task covers
a.
Replacement
b.
Alinement
TOOLS
MATERIALS/PARTS
Tool Kit, General Mechanic, Automotive,
920-3347 Headlamp
NSN 5180-00-177-7033
H 6014(2D1) Sealed Beam
EQUIPMENT CONDITION
Main Engine Shutdown (see para. 2-10)
APU Shutdown (see para. 2-12)
Batteries Disconnected (see para. 4-24.12)
Front Bumper Removed (see para. 4-10.1)
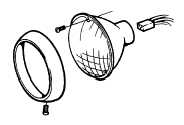
REPLACEMENT
a
Sealed Beam Replacement.
(1)
Remove screw from bottom of bezel.
(2)
Pull up on bezel and remove.
(3)
Remove three small screws that mount sealed
beam to lamp adjusting plate. Do not disturb
headlight adjuster screws.
(4)
Pull out sealed beam and remove plug from back.
(5)
Install plug on new sealed beam.
(6)
Install new sealed beam in fixture. Be sure
lettering on lamp lens is not upside down.
(7)
Install three retaining screws and tighten firmly.
(8)
Replace bezel ring and secure with small screw.
(9)
Check headlamp illuminates.
(10) Replace front bumper, see para. 4-10.1.
b
Lamp Replacement.
(1)
Remove sealed beam as detailed in a preceding.
(2)
Remove eight screws securing lamp pot to cab.
(3)
Pry lamp pot from cab. Scrape all sealing compound from cab panel.
4-444
|