|
| |
TM 5-4210-220-12
4-22. AIR SYSTEM - Continued
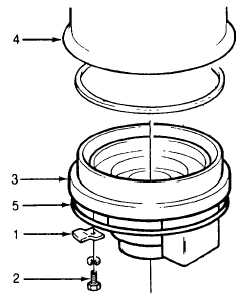
(2)
Tag and disconnect the heater wire.
(3)
Loosen the three capscrews (2) on the
end cover and turn the retaining clamps
(1)
aside
(capscrews
may
be
left
fingertight).
(4)
Locate the notch in the dryer shell (4).
While pushing the end cover (3) up into
the drier, insert the blade of a screwdriver
in the notch and slowly pry out the
retainer ring (6). Remove the end cover
assembly.
(5)
Remove and discard the large O-ring (5)
around the end cover assembly.
(6)
If the heater element has failed, the whole
end cover assembly should be replaced.
For purge valve repair see d following.
(7)
Lubricate and install the new O-ring (5)
around the end cover assembly.
(8)
Push the end cover up into the body and
install the retaining ring (6). Be sure the
gap in the ring is within 1 in. (2.5 cm) of
the notch in the body.
(9)
Locate retaining clamps (1) and tighten capscrews (2).
(10)
Test air drier as detailed in INSTALLATION, steps 5 thru 17, preceding.
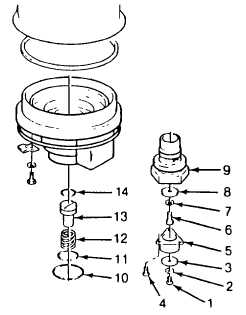
d. Purge Valve and Exhaust Diaphragm Repair
NOTE
These may be repaired with drier
on truck.
Ensure air tanks are drained prior to
repair.
(1)
Remove end cover as detailed in End
Cover Repair, steps 1 thru 5, preceding.
(2)
Remove the single screw (1) securing the
exhaust diaphragm and separate the
diaphragm (3), washer (2), and screw (1).
Discard the diaphragm.
(3)
Remove the three screws (4) securing the
exhaust cover and remove the exhaust
cover (5).
(4)
Remove the purge valve assembly and
the large hex cap nut (9) from the end
cover. Discard both O-rings (10 and 11)
around the cap nut.
4-383
|