|
| |
TM 5-4210-220-12
4-19. WINTERIZATION SYSTEM-Continued
4-19.5 Winterization Heater-Continued
b.
Ignition Spark Coil Repair
NOTE
This can be replaced without
removing heater from truck.
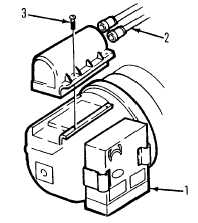
(1)
Unplug connections between electronic
control unit and ignition spark coil.
(2)
Remove ignition leads (2) from ignition
spark coil.
(3)
Remove four screws (3) mounting coil to
top of motor and replace the ignition spark
coil. The ignition spark coil cannot be
repaired.
(4)
Connect ignition leads and fasten new
ignition coil with four screws (3).
c.
Combustion Chamber Repair
NOTE
Unit must be removed from truck
for repair.
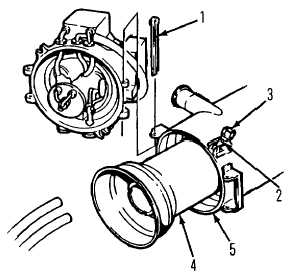
(1)
Loosen nuts (3) and swing aside eyebolts
(2).
(2)
Straighten
cotter
pin
(1)
and,
while
supporting motor/fan assembly, remove pin
from hinge.
(3)
Set motor fan assembly to one side.
(4)
Gently tap on rim of combustion chamber
(4) and pull out of heat exchanger (5).
(5)
Clean inside and outside of chamber with
water and a brush. If combustion chamber
is severely corroded replace.
(6)
To install, push combustion chamber (4)
into heat exchanger (5) until rims are
seated. Tap with soft faced hammer is
necessary.
(7) While supporting motor/fan assembly, aline holes in hinge between motor/fan assembly and
heat exchanger. Slide cotter pin into hinge and bend ends.
(8)
Swing motor/fan assembly to closed position and tighten nuts (3) on eyebolts (2).
(9)
Replace heater assembly in truck. See INSTALLATION preceding.
4-302
|