|
| |
TM 5-4210-220-12
4-18. PUMP, PIPING, AND VALVES - Continued
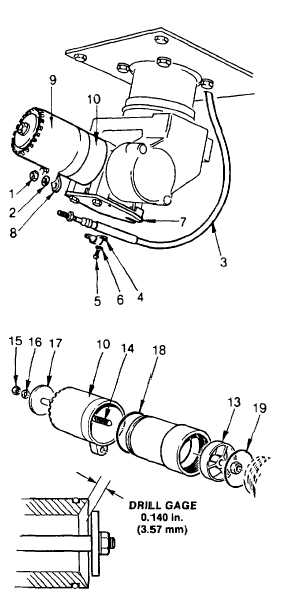
(9) Slide new cable (3) through base plate (18) from inside the truck. Lock into position using clamp (10),
lockwasher and screw (9). Tighten screw firmly.
(10) Thread ball joint (17) onto the cable end rod (15) the same number of turns as recorded in step 6
preceding. Tighten jam nut (16) firmly.
(11) Attach pattern control handle bracket (14) using screws (11), lockwashers (12), and nuts (13).
(12) Attach cable (3) to Z-plate (22) using U-bolt (21) and locknuts (20). Tighten locknuts firmly.
(13) Install nozzle end of cable (3) into water sleeve link (8) and attach using washer (2) and nut (1).
Tighten nut firmly.
(14) Set control handle to 'FOG' position.
Ensure water sleeve (18) is fully retracted
on the water tip (19).
(15) Attach cable (3) to mounting plate (7)
using conduit clamp (4) screws (5) and
lockwashers (6.
(16) Cycle control handle from 'FOG' to
'SOLID' a couple of times.
(17) Set control handle to 'FOG'. Cable
adjustment
is
satisfactory
if
zero
clearance is measured between water
sleeve (18) and tip assembly (19). If
adjustment is necessary repeat steps 15
thru 18 preceding.
c. Nozzle Repair
NOTE
This task can be completed with the
turret mounted on the truck.
(1) Remove nut (1) and lockwasher (2) from
nozzle end of cable (3).
(2) Remove conduit clamp (4) that holds cable
(3) to the mounting plate (7) by removing
screws (5) and lockwashers (6).
(3) Pull cable (3) out of water sleeve link (8).
(4) Carefully pull on water sleeve (9) until it
separates from the water tip (10).
(5) Unscrew the water tip (10) from the turret
head.
4-279
|