|
| |
TM 5-4210-220-12
4-18. PUMP, PIPING, AND VALVES-Continued
4-18.14 Foam Check Valve.
This task covers
a.
Removal
b.
Installation
TOOLS
Tool Kit, Master Mechanic,
NSN 5180-00-699-5273
EQUIPMENT CONDITION
All Piping Drained
Main Engine Shutdown (see para. 2-10)
APU Shutdown (see para. 2-12)
Batteries Disconnected (see para. 4-24)
Pump Body Heat Shield Removed (see para. 4-11.2)
MATERIALS/PARTS
22, Appendix E Pipe Sealant
92-105" Check Valve
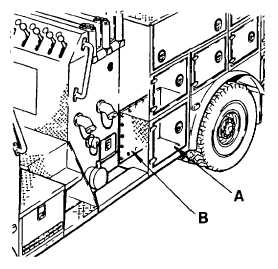
REMOVAL
(1)
Open compartment door (A) and remove all equipment.
(2)
Remove the box rear plate (B).
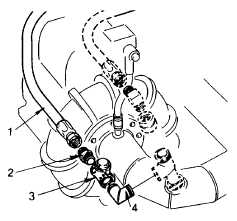
(3)
Remove the foam supply hose (1) and nipple (2).
(4)
Remove the check valve (3) from the elbow (4).
INSTALLATION
(1)
Apply pipe sealant (item 22, Appendix E) to threads and
install check valve (3) onto elbow (4). Ensure the check
valve is installed so the flap is vertical and the flap pivot
is uppermost.
(2)
Apply pipe sealant (item 22, Appendix E) to the
threads and install nipple (2).
(3)
Install and tighten foam supply hose (1) to the nipple
(2).
(4)
Replace box rear plate (B).
(5)
Install equipment in compartment box.
(6)
Start firefighting foam system as detailed in para. 2-
11. Tighten/remake any leaking connections.
4-256/(4-257 Blank)
|