|
| |
TM 5-4210-220-12
4-16. HOSE BODY - Continued
REMOVAL
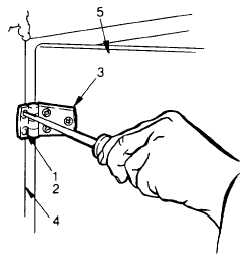
(1)
Support the compartment door (5) and
remove the two machine screws (1) and
locknuts (2) that retain the hinge (3) to the
compartment box (4).
(2)
Remove the remaining hinges similarly to
step 1 preceding. Lift the compartment
door (5) away from the compartment box
and place on a workbench to begin
disassembly.
(3)
If required, remove hinges and install on
new door following procedures described
in Hinge Repair following.
(4)
If required, remove handles and install on
new door following procedures described
in Handle Repair following.
INSTALLATION I
(1)
Lift the compartment door (5) into position. Aline the holes in the hinges (3) with the holes in the
compartment box (4) and install the capscrews (1) and new locknuts (2). Tighten the capscrews and
locknuts. The left hand upper compartment doors have three hinges.
(2)
Carry out the striker and striker bracket adjustment procedures described in para. 4-16.4.
REPAIR
a.
Hinge Repair.
NOTE
If
only
one
hinge
requires
replacing, support door during
the following procedure. If all
hinges have to be replaced carry
out instructions 1 for all hinges.
Place door on workbench before
starting instruction 2.
(1)
Remove the two capscrews (1) and
locknuts (2) that retain the hinge (3) to the
compartment box (4) Discard locknuts.
(2)
Remove the three capscrews (1) and
locknuts (2) that retain the hinge (3) to the
compartment doors (5) One capscrew
tightens into an insert fastener, two
capscrews
use
locknuts.
Discard
locknuts.
(3)
Remove remaining hinges similarly to
steps 1 and 2 preceding
4-197
|