|
| |
TM 5-4210-220-12
4-15. AUXILIARY POWER UNIT - Continued
INSTALLATION
(1)
Ease flywheel (9) onto end of crankshaft taking care key and socket are alined.
(2)
Install washer (5) and capscrew (6) and tighten to 100 ft lb (135 Nm).
(3)
Install screen (8) and rope pulley (7) on flywheel.
(4)
Install and tighten washers (4) and capscrews (3) to 9 ft lb (12 Nm).
(5)
Be sure gasket (14) is fitted to engine cowling (2).
(6)
Install cowling (2) with six machine screws (1).
(7)
Be sure intake and exhaust gaskets are installed on head studs.
(8)
Install left hand (10) and right hand (13) shrouds over intake and exhaust studs.
(9)
Install washers (11) and capscrews (12).
(10)
Install injector feed line on injector and injector pump Install clamp retaining bolt.
(11)
Install muffler and air intake couplings ensuring intake and exhaust gaskets are fitted between left hand and
right hand shrouds and the couplings.
(12)
Install engine on base, see para. 4-15.1 ASSEMBLY.
(13)
Install APU in truck, see para. 4-15.1 INSTALLATION.
REPAIR
(1)
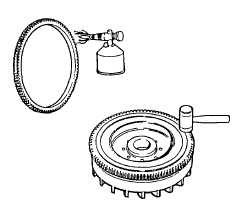
To replace ring gear, remove flywheel as detailed in REMOVAL preceding.
(2)
Inspect keyway and tapered socket. Replace flywheel and ring gear if damaged.
(3)
Inspect ring gear if teeth are worn or damaged, replace ring gear. See following.
(4)
Place flywheel on wooden block so ring gear is
clear of support base.
(5)
Using a large punch and hammer, drive ring gear
clear of flywheel. If it will not break away,
carefully heat ring with gas torch and drive off
when warm.
(6)
Heat new ring with gas torch. Do not allow any
part to become more than blue hot. When evenly
warm, place over flywheel and drive it onto its
seat quickly and evenly using a hammer and
punch.
(7)
Install
flywheel
on
engine
as
detailed
in
INSTALLATION preceding.
4-169
|