|
| |
TM 5-4210-220-12
4-12. CAB - Continued
INSTALLATION
(1)
Install bracket (11) using two screws (7) and nuts (6) Tighten nuts firmly.
(2)
Be sure split sleeve (12) is placed on the lamp shaft and push the shaft through bracket (11) until sleeve is
seated and lamp base butts against bracket. Secure sleeve by tightening screw (B).
(3)
Install rubber bushing (10), wire clip (9), and arm (8) over shaft. Attach arm to cab wall using screw (7)
and nut (6).
(4)
Install collar (5) over shaft and be sure it engages with the arm (8) While pulling on lamp shaft, push collar,
arm (8), and wire clip (9) snug against rubber bushing (10) and tighten screw (A).
NOTE
The lamp assembly shaft consists of an inner shaft and shaft tube, and an outer shaft tube. The
inner shaft and a driven gear inside the handle assembly are keyed together. The outer shaft
tube is notched to permit attachment to the handle by wedge and screw.
(5)
While holding the lamp and pushing the handle assembly onto the lamp shaft, rotate the handle until the
internal gear and shaft slip together.
(6)
Be sure the notch in outer shaft alines with wedge mounting hole in handle and install wedge (3) and screw
(2).
(7)
Connect lamp wiring by installing new butt splice (1) Attach wire to wire clip (9).
REPAIR
a.
Lamp Head Repair.
NOTE
Spotlight may remain installed on
truck.
To replace lamp bulb, carry out steps (1), (9), and
(10)
only.
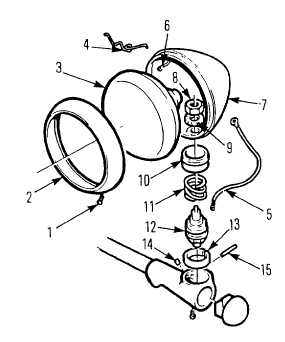
(1)
Remove screw (1) and lamp ring (2)
Disconnect wires (5) and (6) from bulb (3)
Remove retaining springs (4) attaching bulb
to lamp ring and remove bulb.
(2)
Remove wire (5), nut (8), and washer (9)
Remove lamp shell (7) from lamp housing.
(3) Remove screw (14), pin (15), bushing (10),
and spring (11).
4-91
|