|
| |
TM 5-4210-220-12
4-12. CAB - Continued
4-12.2 Cab Door - Continued
(4) Pull door handle free of door panel.
(5) Inspect handle gasket (5) and replace if
damaged or deteriorated.
(6) Inspect weatherstrip and other accessible
door components. Replace any found
damaged or deteriorated. When replacing
weatherstrip, bond in place with contact
adhesive (item 6, Appendix E). Be sure to
maintain 1/16 in. (1.5 mm) clearance
between ends of weatherstrip and vertical
glass runs.
(7) Install door handle in door panel and attach
using keys (4). Push keys down firmly to
secure handle. Ensure spring clips engage
on keys.
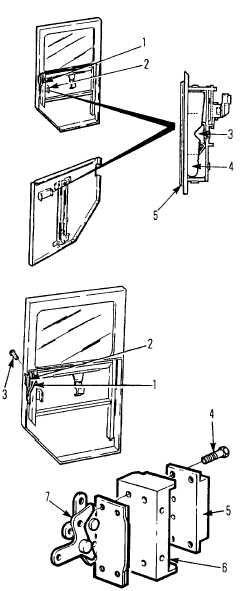
(8). Attach rod (1) to outside door handle
(9) Install inside lower door panel to outer door
panel as detailed in steps 14 and 15 of
Window Repair procedure (b. preceding).
e.
Door Latch Repair
(1) Remove inside lower door panel as detailed
in steps 2 and 3 of Window Repair
procedure (b. preceding).
(2) Disconnect rod (1) from door latch (2).
(3) Remove screws (3) and remove latch from
door panel.
(4) Disassemble door latch (5), latch support
(6), and latch mounting plate (7) by
removing screws (4).
(5) Inspect door latch components. Replace
faulty parts. Lubricate pivot points and
moving parts with white grease (Item 34,
Appendix E).
(6)
Assemble latch components as shown
Tighten capscrews (4) to 8 ft lb (11 Nm).
(7) Inspect weatherstrip and other accessible door components. Replace any found damaged or deteriorated
When replacing weatherstrip, bond in place with contact adhesive (Item 6, Appendix E.) Be sure to
maintain 1/16 in. (1.5 mm) clearance between ends of weatherstrip and vertical glass runs.
4-88
|