|
| |
TM 5-4210-220-12
4-12. CAB - Continued
4-12.2 Cab Door - Continued
CAUTION
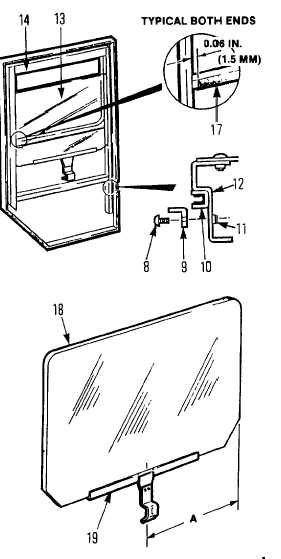
Prevent breaking the glass. Move window (13) clear of glass run channel (14) before carrying out
step 5.
(5)
Carefully pry glass run (10) loose from bond with window support (12) and remove both glass run and
window.
NOTE
If clearance between vertical window supports is insufficient to allow removal of window remove
angle piece (15) and glass run (16) also. Follow procedure detailed in steps 4 and 5.
(6)
Remove old adhesive from window support
(12) and reuseable glass run channel.
(7)
Inspect
weatherstrip
(17)
and
insert
fasteners
(11)
Worn
or
deteriorated
weatherstrip and loose or damaged inserts
must be replaced. Notify Direct Support
Level for repair of inserts. Use contact
adhesive (item 6, Appendix E) when
replacing weatherstrip (17).
(8)
Inspect components for wear and damage
and replace if faulty or deteriorated.
(9)
When replacing window (13), bond new
window pane (18) and glass channel
assembly (19) together using contact
adhesive (item 6, Appendix E) maintaining
dimension A as shown.
Right door window A = 12.8 in. (326 mm)
Left door window A = 15.4 in. (391 mm)
(10)
Apply contact adhesive (Item 6, Appendix
E) to glass arm channel. Apply adhesive
very sparingly. Too much adhesive will
make future removal difficult.
(11) Fit window and glass arm channel together
and install in door. Be sure glass arm butts
against upper glass arm channel (14) and
seats firmly against window support.
(12)
Install angle piece (9) and attach using
screws. (8) Check that window slides up
and down easily.
4-86
|