|
| |
TM 5-4210-218-13&P
4-11 PULLEY ASSEMBLY REPLACEMENT (Refer to Figure 4-3)
This task covers:
a.
Removal
b.
lnstallation
INITIAL SETUP:
Equipment Conditions
Tools
Reference
General Mechanics Tool Box, Item 1, Section
Cover removed from Recovery / Recharger Unit;
III, Appendix B.
paragraph 2-6.1
Materials/Parts
Self-locking nuts
Air supply disconnected, paragraph 2-7
Pulley assembly
4-11.1 Removal.
a.
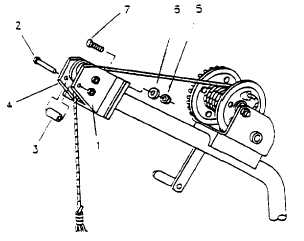
Remove nut (1), bolt (2) and spacer (3) at front of pulley assembly (4). Retain nut, bolt and spacer for reuse.
b.
Lift cable out of pulley groove and position out of way for installation.
c.
Remove four nuts (5), washers (6), and bolts (7) securing pulley assembly (4) to hoist column mounting block.
Remove pulley assembly. Retain bolts, washers, and nuts for reuse.
4-11.2 Installation.
a.
Position new pulley assembly (4) on hoist column mounting block and secure with four bolts (7), washers (6), and
nuts (5).
b.
Place winch cable in pulley groove.
c.
Install spacer (3) bolt (2) and nut (1) at front of pulley assembly (4).
Figure 4-3. Pulley Assembly Replacement
4-10
|